Thursday, October 31, 2013

Green Dress Part 2


Part 2 is comprised of 4 different looks. I'm sort of, kinda, totally in love with this dress. I feel like this shade of green & this cut is just really versatile. I want to wear it...a lot. Everyone needs a green dress in their closet. ;) 

Look 1

Look 2

Look 3


Look 4


The 3 belts worn, coral blazer & black booties are all from Target. The gray sweatshirt, coral flats & gold flats are from Old Navy, all sale/clearance. The 2 necklaces are from Purple Peridot. They have great prices! I've been waiting for the perfect piece to wear with the pink (thrifted for $6!) jacket for ages as well, so I was super excited about this pairing.


Tuesday, October 29, 2013

Green Dress Part 1

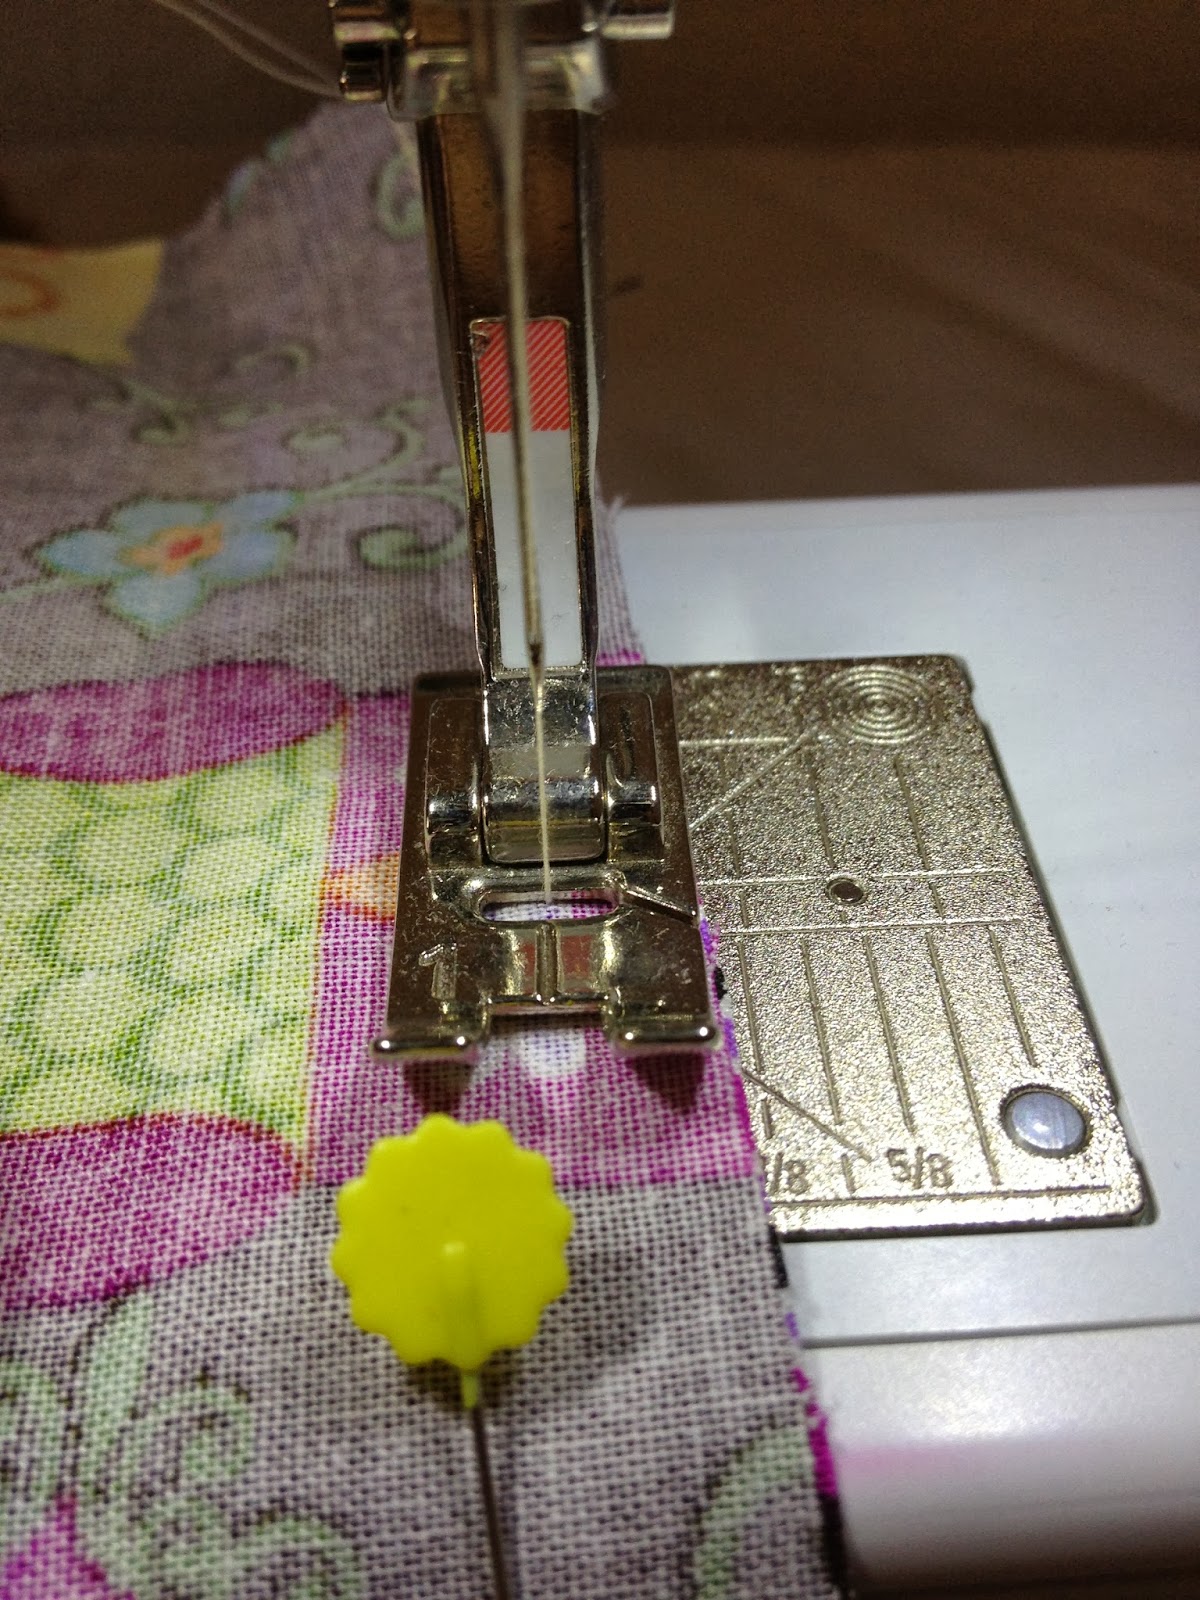
As soon as I saw this dress, I grabbed it. It had so much unexplored potential and I couldn't wait to play with it! The first thing I decided to do was dye it from it's original yellow to a more flattering green. I picked up the dye from Beverly's for about $3.50 & went to work. The dying was fairly easy since I could just throw it in the wash + add salt and let it do it's thing. After that was done, I cut off 6 inches & did a zig zag stitch just to finish it. I like to think of it as efficient hemming. :) Once that was all completed, I started playing with styling options. There were just so many! Thus, this week's posts are all about the green dress.


Look 1. 
I actually wore this outfit to have some solo time (it's the pinnacle of excitement to drink coffee alone) + take my oldest trick or treating. It's relaxed & comfortable, but still put-together and not sloppy. Plus, pearls look good with just about anything! 


Dress- thrifted + dye, $7.50
Flats- Old Navy clearance, $7
Belt- Kohl's, came with shorts, $12
Denim Jacket- Ralph Lauren, 5ish years old, $60
Pearls- gift eons ago.. 
Bracelet- Marley Lilly, flash sale, $20 

Thursday, October 24, 2013

Sweater Vest Part 2


Who doesn't love selfies in their bedroom mirror? They're just the best photos ever. ;) I love how different the sweater (vest? I still don't know what to call it. Sweater vest sounds so...80s) looks with the cream top & nude flats. The ring was a fun little impulse purchase from Beverly's. The jeans & sweater are thrift finds, everything else from chain stores. 


Jeans- Goodwill, $8
Shirt- TJ Maxx, $12
Sweater- thrift, $4
Shoes- Target, $14 (on sale!)
Ring- Beverly's, $5.50 total, I think* (it's acutally 2 pieces)
Bracelets- Old Navy, Target, Caroline G.
Necklace- Old Navy

Tuesday, October 22, 2013

Date Day Style


The hubby & I stole a few hours alone this last weekend...and it was glorious. Brunch, used book sale, thrift shops...overall, a wonderful date day. The weather here has been a bit wonky as of late, so Saturday it was plenty warm for a dress and sandals. This is a dress I picked up from a thrift stores ages ago and it's one of my favorite finds to date. I hemmed it, then did a zig-zag stitch after it frayed a little. The necklace is a new little treasure, purchased off of Instagram. I felt so awkward taking these photos & would have had more, but a security guard just stopped and watched. He was kind enough to take a photo of the hubby & I together, but I was too embarrassed to take any more solo ones afterwards. Gotta love it. 


Dress- thrifted; $6 (? can't remember exactly)
Belt- Kohl's, came with shorts, $12
Sandals- Target clearance, $12
Coach bag- outlet sale over 3 years ago, $70
Necklace & earrings-set from Instagram, $12

Thursday, October 17, 2013

boots + bows

I wore this outfit last week to a spouse association meeting...and a solo Target/Starbucks run. The sweater (vest? sweater vest? sleeveless sweater?) was a thrift find from Goodwill for only $7! I was thrilled it was finally cool enough to wear it, but definitely regretted the short sleeves later... The necklace is from an adorable boutique in Statesboro, GA that I happened to get when they were doing a flash sale on their Facebook page. 


selfie in the target fitting room...


        Sweater- Goodwill, $7
   Tee- Target, $7
Jeans- Forever 21, $10
Boots- Wet Seal, $20 (I think?)
Bag- gift
Necklace- Walker Boutique

Tuesday, October 15, 2013

Skirt Tutorial!

Step 1: Gather your supplies...
This is a super easy way to make a skirt. Once you have this down, it should only take 30-60 minutes to make one. You'll need about a yard of fabric (depending on size & print), a machine (or you could always hand sew, but that will take more time), coordinating thread, scissors, an area to cut your fabric, & a measuring tape or ruler.


         Step 2: Measure your waist. Divide that in half, then cut.
                   My daughter's waist is 20 inches, so I cut at the 11 inch mark.  
Step 3: After the fabric is cut, put right sides together & pin.  


 I made this considerably smaller for my daughter, so you'll just scale up to fit you. Also, to have more fullness & ensure it'll fit my hips, I always cut a few inches bigger than actually necessary. I used 100% cotton, 44 inch wide fabric, so when I was initially cutting the fabric was folded in half. After I cut it for the waist, I cut it in half at the fold, to have 2 even pieces.
Step 4. Sew those two sides together! Both sides, leaving the top & bottom alone. 


     Step 5: Not 100% necessary, but zig-zag over all raw
 edges helps keep things looking nicer.

Step 6: Zig-zag stitched the raw bottom hem, then rolled....

Step 7: Sewing a straight stitch over the rolled hem. Just makes it look a smidgen neater. 
I normally do the hem before I take care of the waist, but that's only because I typically hem everything about the same length. 

Step 8: Waist time! I used 1 inch elastic & measured what was comfortable around my daughter's waist.
I folded over the top just enough so the elastic would fit and did a straight stitch, leaving about an inch open so I could wiggle the elastic in. 

Step 9: Pinned the end of the elastic in place, then used a safety pin to pull the other end through. When it had come all the way through, I sewed it into place, then closed the inch opening I'd left. 
Step 10: Finished product! 

Little bit wearing her new skirt...she loves it! :) 

Thursday, October 10, 2013

As comfortable as yoga pants...


The promised skirt tutorial will be up on Tuesday y'all! I ran out of time this week, so it'll be posted next week. With that being said, this was my running errands-playing with the kids-hitting up target outfit. It's just as comfortable as yoga pants & a tank, but looks a smidgen more put together. The sunnies were an impulse purchase from Target & I'm so glad I got them! Who can resist polka dots?! I certainly can't.

Merino Cool...so perfect for fall


                                                     Sweatshirt- Old Navy, $15  (looks like it's on sale on their website!)
                                                     Teal Tank- Target, $7
                                                     Jeans- Old Navy clearance, $10
                                                     Sunglasses- Target, $12.99
                                                     Flats- H&M, $12 (2011)
                                                     Bubble Necklace- Caroline G. shipping, $5.98
                                                     Purse- gift
                                                     Monogram ring- Marley Lilly , purchased during flash sale, $20


Tuesday, October 8, 2013

Chevron & Anchors

Continuing with my love of chevron + being crafty, one of the outfits in this post is a chevron skirt I made. It's SO easy. Of course, my fabric came from Savannah Sewing. I may live thousands of miles away, but I'll always get my favorite fabrics from there. I'd originally bought this fabric with the intention of making pillows or a makeup bag, but changed my mind. It's a heavier weight, so it's perfect for fall & winter too! The best part of this skirt is that I no longer have in it my possession as I sold it to a good friend of mine. The other skirt I made for a tea that I attended with the Spouse Association here. This skirt was even easier to make!

Made 2 chevron skirts-1 for my mom!
Photo from my Instagram
Sold Skirt!


The skirt itself is super easy to make. I'll have a tutorial for it Thursday! :) 

Friday, October 4, 2013

Peplum + Skinny Jeans

I'm officially a peplum convert. This lovely top came from TJ Maxx for only $10! Best part, it's a Laundry by Shelli Segal top that normally goes for over $100. I totally did a happy dance when I was checking out the tag. If you haven't checked out TJ Maxx, seriously...go, now. They have some pretty fabulous items there. I'm a huge Lilly Pulitzer fanatic and have found a ton of home, kitchen & phone accessories as well. Now if only I could find Kate Spade clothing in my size...


Required Selfie


Jacket- gift
Necklace- gift
Top- Laundry by Shelli Segal, TJ Maxx, clearance $10
Jeans- Gap, thrifted, $2.75
Shoes- Ann Taylor, sale, $10

Wednesday, October 2, 2013

Getting Crafty with Chevron

Chevron! 
So my sewing/crafting/awesome kid free space is in the corner of my bedroom. As of a few days ago, it was an unorganized mess. I'm slowly working on fixing that though! I ordered some cute prints from a girl of etsy & made 3 cute little fabric cork board things. I'll be posting a before/after shot as soon as I have arranged the way I like...it's going to be so cute! Anyway, one of the many things I planned to do was make a seat cushion. The chair I have is just one from Ikea (best place ever, right?) and I get so uncomfortable sitting there after a while. I just got some adorable chevron from Savannah Sewing and picked up some stuffing from Beverly's. I think it took me a total of 30 minutes to make this, from start to finish. It's reversible too!

I guess to get technical on this, you'll need to measure your seat for the cushion. In my laziness, I held the fabric up to it & cut. I left a little extra to allow for the seams, laid it over the seat & pinned at the edges. I had two old waist ties that I used as the seat ties. Lucky me, they were the perfect length! Just pinned those in place and then sewed the cushion, right sides together. (Which just means the pretty print is on the inside, the blank side is on the outside.)

After sewing it right sides in, leaving a few inches open & flipping it to the right sides out...it's time to stuff! I like my cushions like my pillows, very full. The last thing I needed to was sew the opening shut. Pinned it + then hand stitched it closed. 
Hand stitch time!  

reversible cuteness! 
The finished project!